Running Hubzilla with a YunoHost server
Running a server (whether at home or on a rented VPS or root server) with YunoHost is easy. The software relieves you of a great deal of administrative work in detail and offers countless applications that can be installed, commissioned and maintained with little effort.
Hubzilla is also one of the apps offered by YunoHost. Hubzilla can be installed with just a few entries and requirements.
You need your own domain or subdomain. It is important to ensure that no other Fediverse software has been installed under this domain. This is a ‘special feature’ of Fediverse. Once used, domains are ‘burnt’ for the Fediverse if you want to install new or different Fedi software under them. But never mind... let's assume we have a fresh, ‘virgin’ domain. Then the installation is done with just a few clicks and entries.
Unfortunately, the ‘Hubzilla’ app at YunoHost is no longer really actively supported. As a result, updates (including important, security-relevant updates that should be carried out promptly) are very delayed. Currently (end of March 2024), the last update was over two months ago and there have already been four updates since then... two of which were security-relevant and for which an update was expressly recommended.
For exactly this reason, I have now installed Hubzilla under YunoHost in a different way. The advantages offered by YunoHost remain the same (simple backups, no manual setup of reverse proxy, up-to-dateness of the underlying system, setup of a database, etc.).
And here's how it works:
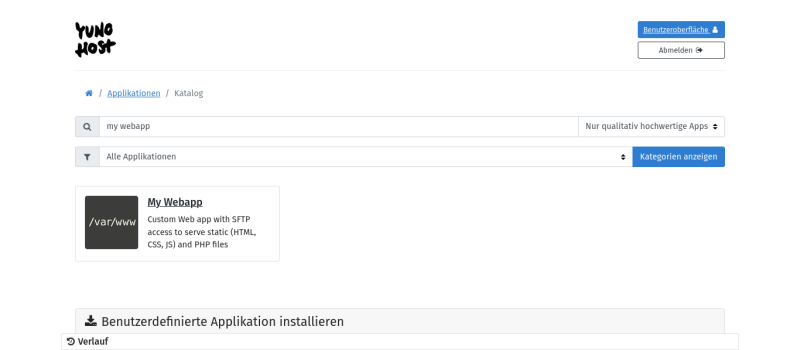
YunoHost offers a ‘universal app’, which is called ‘My Webapp’. This can be used to install a customised web application. It offers SFTP access, a database and PHP if required. A directory is created under /var/www, which can be accessed via the domain selected during installation.

This is the ideal location for a Hubzilla installation. The first step is to create a corresponding domain in YunoHost and, of course, create a certificate (Let's Encrypt). This works in exactly the same way as for the ‘normal’ Hubzilla installation, e.g. with the YunoHost administration interface. Select the ‘My Webapp’ application from the catalogue under Applications → +Install.

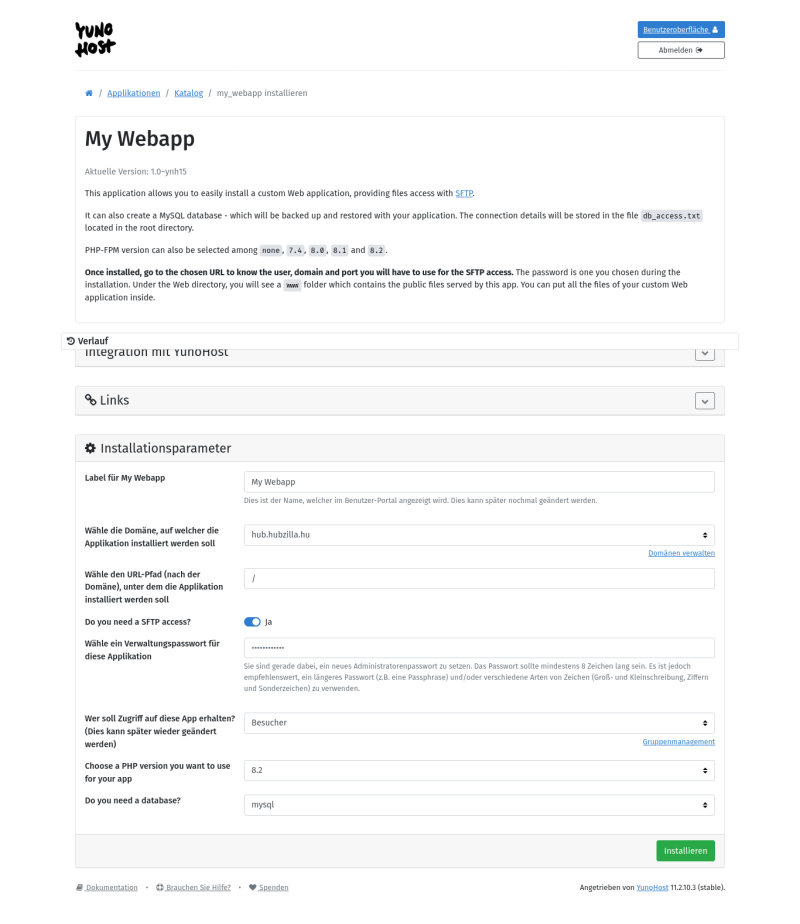
Now you can enter a name for the label of the tile (in the YH interface) and select the domain/subdomain. To avoid problems, you should only leave ‘/’ in the URL path. For a public hub, select ‘Visitors’ in the ‘Who should have access to this app?’ field.
Select 8.2 as the PHP version for Hubzilla and then the type of database (MySQL or Postgresql).
Then start the installation of the custom web app.
Once it has run, you must log in to your own server via SSH. In the directory /var/www you will now find a new directory my_webapp and in this a subdirectory www. The latter is the directory that is delivered by the web server when the domain is called.
Now you can easily install Hubzilla according to the official installation instructions. In the root directory (my_webapp/www) you will find a file db_access.txt, which contains the access data for the database. Important: save! We still need the data (database name, database user, database password) for the installation of Hubzilla.
Now the directory my_webapp/www must be emptied, i.e. all files contained therein must be deleted so that the Hubzilla repo can be cloned there.
So that the file permissions fit immediately... and in general anyway, it is recommended to continue at this point as user ‘my_webapp’. To do this, enter
yunohost app shell my_webapp.
You are now in the my_webapp directory. With
git clone https://framagit.org/hubzilla/core.git www
to clone the repo to the correct location. Then it is best to change to the www directory immediately:
cd www
A .htaccess file is also created during cloning. This is used to configure the Apache web server. However, YunoHost uses nginx and not Apache, which is why this file is not important.
During the installation of My Webapp, configuration files are created under /etc/nginx/conf.d/<domain of my_webapp>. However, these do not fulfil the requirements of Hubzilla. The my_webapp.conf must look like this:
#sub_path_only rewrite ^/$ / permanent;

location / {
  # Path to source
  alias /var/www/my_webapp/www/;
  if (!-e $request_filename) {
    rewrite ^(.*)$ /index.php?q=$1;
  }

  # Default indexes and catch-all
  index index.php;
  charset utf-8;

  # Common parameter to increase upload size limit in conjunction with dedicated php-fpm file
  client_max_body_size 50M;
  client_body_buffer_size 128k;
  location ~* \.php$ {
    try_files $uri =404;
    fastcgi_pass unix:/var/run/php/php8.2-fpm-hubzilla.sock;
    fastcgi_index index.php;
    include fastcgi_params;
    fastcgi_param SCRIPT_FILENAME $document_root$fastcgi_script_name;
  }

  # make sure webfinger and other well known services aren't blocked
  # by denying dot files and rewrite request to the front controller
  location ^~ /.well-known/ {
    allow all;
    if (!-e $request_filename) {
      rewrite ^(.*)$ /index.php?q=$1;
    }
  }

  # statically serve these file types when possible
  # otherwise fall back to front controller
  # allow browser to cache them
  # added .htm for advanced source code editor library
  # location ~* \.(jpg|jpeg|gif|png|ico|css|js|htm|html|map|ttf|woff|woff2|svg)$ {
  #  expires 30d;
  #  try_files $uri /index.php?q=$uri&$args;
  # }

  # block these file types
  location ~* \.(tpl|md|tgz|log|out)$ {
    deny all;
  }

  # deny access to all dot files
  location ~ /\. {
    deny all;
  }

  #deny access to store
  location ~ /store {
    deny all;
  }

  #deny access to util
  location ~ /util {
    deny all;
  }

  # Include SSOWAT user panel.
  include conf.d/yunohost_panel.conf.inc;
}
Some directories with corresponding access rights are essential for a Hubzilla installation within the Hubzilla directory (in this case my_webapp/www). They are actually created during the installation via the web browser (but probably not always). However, it is safer and does no harm if you use
cd www
to change to the Hubzilla directory and delete them with
mkdir -p ‘store/[data]/smarty3’
chmod -R 777 store
to create it.
To also install the Hubzilla add-ons, you must also install
util/add_addon_repo https://framagit.org/hubzilla/addons.git hzaddons
util/update_addon_repo hzaddons
must be entered.
PHP extensions: The PHP extensions sodium, gmp (or bcmath) and intl are required for Hubzilla from version 9 (current). In my YunoHost installation, sodium and gmp were present, but intl was missing.
You can find out which extensions are installed and activated with this command:
php -m
With
sudo apt-get update
and
sudo apt-get install php8.2-intl
the missing extension is quickly installed.
php -m | grep intl
should now also display this.
Now the time has come to call up the URL of the new installation in the web browser.
Everything should now run smoothly (otherwise, if errors occur, follow the official installation instructions to get to the bottom of them).
Now it is necessary to look at the freshly created .htconfig.php and adjust the path to PHP there:
// Location of PHP command line processor
App::$config['system']['php_path'] = '/usr/bin/php8.2';
If you are still operating as user my_webapp, you should enter
php -v
to display the PHP version currently in use. Version 8.2 should be displayed.
NOTE:
Calling php without specifying a path calls /usr/bin/php. This is a symbolic link to /etc/alternatives/php. And this in turn is a symbolic link to the PHP programme file generally used in the system. During my installation, I had once installed an app that required php7.4. YunoHost had therefore linked the php under /etc/alternatives to /usr/bin/php7.4. Actually, this should not be a problem in the my_webapp environment and point to php8.2 (as selected during installation). However, this was not the case for me at the beginning (it is now, for whatever reason).
To ‘fix’ this, I changed the symbolic link /etc/alternatives/php to /usr/bin/php8.2.
This is necessary because the PHP scripts from util shebang the interpreter via
#!/usr/bin/env php
and thus access the entry in /etc/alternatives. When using scripts from util, if this refers to php7.4, the programme terminates with the error message that a PHP version that is too old is being used.
Now follows another very important step: creating a cron job for important background services.
To do this, call
crontab -e
and add the line
*/10 * * * * * cd /var/www/my_webapp/www; /usr/bin/php8.2 Zotlabs/Daemon/Master.php Cron > /dev/null 2>&1
to.
And now the Hubzilla installation under YunoHost should run properly. The rest should be known (first register an account with the mail address given before... this is the admin account) and then just ‘use’ ;-)
IMPORTANT NOTE ON YUNOHOST UPDATES:
At least with the last update of the my_webapp used to version 1.0-ynh18, but I suspect also with every subsequent one, the nginx configuration file in /etc/nginx/conf.d/yourdomain.d/my_webapp.conf is overwritten with default settings, which means that Hubzilla no longer works.
It therefore makes sense to keep this configuration file in a separate backup directory on the server and overwrite the updated file with it. Alternatively, you can also extract it from the YunoHost backup file that is automatically created during the update and copy it back to the above-mentioned directory (overwrite).